java面向对象中的接口概念

特性 接口 (Interface) 抽象类 (Abstract Class)
继承方式 可以被多个类实现(多重继承) 只能被一个类继承(单继承)
方法实现 默认方法没有实现,除非是 defaultstatic 方法 可以有抽象方法,也可以有具体方法
成员变量 默认是 public static final 可以是任何类型的变量
构造方法 无构造方法 可以有构造方法
访问修饰符 只能是 public 可以是 publicprotectedprivate
是否支持多重继承 支持多重继承(可以实现多个接口) 不支持多重继承(单继承)
适用场景 用于定义行为规范,多个不相关的类共享相同的行为 用于提供共性功能,提供默认实现,通常用于类层次结构

在抽象类中,抽象方法本质上是定义接口规范:即规定高层类的接口,从而保证所有子类都有相同的接口实现,这样,多态就能发挥出威力。

如果一个抽象类没有字段,所有方法全部都是抽象方法:

abstract class Person {
    public abstract void run();
    public abstract String getName();
}

就可以把该抽象类改写为接口:interface。

在Java中,使用interface可以声明一个接口:

interface Person {
    void run();
    String getName();
}

所谓interface,就是比抽象类还要抽象的纯抽象接口,因为它连字段都不能有。因为接口定义的所有方法默认都是public abstract的,所以这两个修饰符不需要写出来(写不写效果都一样)。
当一个具体的class去实现一个interface时,需要使用implements关键字。举个例子:

class Student implements Person {
    private String name;

    public Student(String name) {
        this.name = name;
    }

    @Override
    public void run() {
        System.out.println(this.name + " run");
    }

    @Override
    public String getName() {
        return this.name;
    }
}

我们知道,在Java中,一个类只能继承自另一个类,不能从多个类继承。但是,一个类可以实现多个interface,例如:

class Student implements Person, Hello { // 实现了两个interface
    ...
}

接口继承

一个interface可以继承自另一个interface。interface继承自interface使用extends,它相当于扩展了接口的方法。例如:

interface Hello {
    void hello();
}

interface Person extends Hello {
    void run();
    String getName();
}

此时,Person接口继承自Hello接口,因此,Person接口现在实际上有3个抽象方法签名,其中一个来自继承的Hello接口。

default方法

在接口中,可以定义default方法。例如,把Person接口的run()方法改为default方法:

// interface
public class Main {
    public static void main(String[] args) {
        Person p = new Student("Xiao Ming");
        p.run();
    }
}

interface Person {
    String getName();
    default void run() {
        System.out.println(getName() + " run");
    }
}

class Student implements Person {
    private String name;

    public Student(String name) {
        this.name = name;
    }

    public String getName() {
        return this.name;
    }
}

实现类可以不必覆写default方法。default方法的目的是,当我们需要给接口新增一个方法时,会涉及到修改全部子类。如果新增的是default方法,那么子类就不必全部修改,只需要在需要覆写的地方去覆写新增方法。

default方法和抽象类的普通方法是有所不同的。因为interface没有字段,default方法无法访问字段,而抽象类的普通方法可以访问实例字段。

微信内置ocr私有部署

本文主要在linux使用
系统为Debian12
注意 在云服务器部署需要测试服务器是否可以使用,我在阿里云上测试 与本地效果差别特别大
别人封装好的docker镜像

docker pull golangboyme/wxocr:latest
docker run -d -p 5000:5000 --name wechat-ocr-api golangboyme/wxocr

依赖项目
https://github.com/swigger/wechat-ocr/tree/master/src
编译的时候需要用高本版的python 有一个最低版本我忘记了 用3.12以上肯定没问题

mkdir build
cd build 
cmake..
make

得到一个python的模块
其他相关的文件可以从微信的linux安装包找到

python调用代码

import wcocr
import os
import uuid
import base64
from flask import Flask, request, jsonify, render_template, send_from_directory

app = Flask(__name__)
wcocr.init("./wx/opt/wechat/wxocr", "./wx/opt/wechat")

@app.route("/ocr", methods=["POST"])
def ocr():
    try:
        # Get base64 image from request
        image_data = request.json.get("image")
        if not image_data:
            return jsonify({"error": "No image data provided"}), 400
        # Extract image type from base64 data
        image_type, base64_data = extract_image_type(image_data)
        if not image_type:
            return jsonify({"error": "Invalid base64 image data"}), 400

        # Create temp directory if not exists
        temp_dir = "temp"
        if not os.path.exists(temp_dir):
            os.makedirs(temp_dir)

        # Generate unique filename and save image
        filename = os.path.join(temp_dir, f"{str(uuid.uuid4())}.{image_type}")
        try:
            image_bytes = base64.b64decode(base64_data)
            with open(filename, "wb") as f:
                f.write(image_bytes)

            # Process image with OCR
            result = wcocr.ocr(filename)
            return jsonify({"result": result})

        finally:
            # Clean up temp file
            if os.path.exists(filename):
                os.remove(filename)

    except Exception as e:
        return jsonify({"error": str(e)}), 500

# 创建静态文件夹
static_dir = os.path.join(os.path.dirname(os.path.abspath(__file__)), "static")
if not os.path.exists(static_dir):
    os.makedirs(static_dir)

def extract_image_type(base64_data):
    # Check if the base64 data has the expected prefix
    if base64_data.startswith("data:image/"):
        # Extract the image type from the prefix
        prefix_end = base64_data.find(";base64,")
        if prefix_end != -1:
            return (
                base64_data[len("data:image/") : prefix_end],
                base64_data.split(";base64,")[-1],
            )
    return "png", base64_data

@app.route("/")
def index():
    return render_template("index.html")

# Handle unsupported methods for /ocr route
@app.route("/ocr", methods=["GET", "PUT", "DELETE", "PATCH"])
def unsupported_method():
    return jsonify({"error": "Method not allowed"}), 405

# Handle non-existent paths
@app.errorhandler(404)
def not_found(e):
    return jsonify({"error": "Resource not found"}), 404

if __name__ == "__main__":
    # 确保templates目录存在
    templates_dir = os.path.join(
        os.path.dirname(os.path.abspath(__file__)), "templates"
    )
    if not os.path.exists(templates_dir):
        os.makedirs(templates_dir)

    # 确保temp目录存在
    temp_dir = os.path.join(os.path.dirname(os.path.abspath(__file__)), "temp")
    if not os.path.exists(temp_dir):
        os.makedirs(temp_dir)

    app.run(host="0.0.0.0", port=5000, threaded=True)

html文件

<!DOCTYPE html>
<html lang="zh-CN">

<head>
    <meta charset="UTF-8">
    <meta name="viewport" content="width=device-width, initial-scale=1.0">
    <title>微信OCR文字识别工具</title>
    <style>
        :root {
            --primary-color: #07c160;
            --secondary-color: #576b95;
        }

        body {
            font-family: "Helvetica Neue", Helvetica, Arial, sans-serif;
            max-width: 1200px;
            margin: 0 auto;
            padding: 20px;
            background: #f5f5f5;
            color: #333;
        }

        .container {
            background: white;
            border-radius: 12px;
            padding: 30px;
            box-shadow: 0 2px 12px rgba(0, 0, 0, 0.1);
        }

        h1 {
            color: var(--primary-color);
            text-align: center;
            margin-bottom: 30px;
        }

        .upload-section {
            border: 2px dashed #ddd;
            border-radius: 8px;
            padding: 30px;
            text-align: center;
            margin: 20px 0;
            transition: all 0.3s;
        }

        .upload-section:hover {
            border-color: var(--primary-color);
            background: #f8fff9;
        }

        .preview-image {
            max-width: 100%;
            max-height: 400px;
            margin: 20px 0;
            border-radius: 8px;
            display: none;
        }

        .input-group {
            margin: 20px 0;
        }

        input[type="file"],
        input[type="text"] {
            width: 100%;
            padding: 12px;
            border: 1px solid #ddd;
            border-radius: 6px;
            margin: 10px 0;
        }

        button {
            background: var(--primary-color);
            color: white;
            border: none;
            padding: 12px 30px;
            border-radius: 6px;
            cursor: pointer;
            font-size: 16px;
            transition: all 0.3s;
        }

        button:hover {
            opacity: 0.9;
            transform: translateY(-1px);
        }

        .result-table {
            width: 100%;
            border-collapse: collapse;
            margin-top: 20px;
            display: none;
        }

        .result-table th,
        .result-table td {
            padding: 12px;
            border: 1px solid #eee;
            text-align: left;
        }

        .result-table th {
            background: var(--secondary-color);
            color: white;
        }

        .loading {
            display: none;
            text-align: center;
            color: var(--primary-color);
            margin: 20px 0;
        }

        .error {
            color: #ff4d4f;
            margin: 10px 0;
            display: none;
        }

        .image-container {
            position: relative;
            margin: 20px 0;
            display: inline-block;
        }

        .text-box {
            position: absolute;
            border: 2px solid var(--primary-color);
            background-color: rgba(7, 193, 96, 0.1);
            cursor: pointer;
        }

        .text-tooltip {
            position: absolute;
            background: white;
            border: 1px solid #ddd;
            padding: 8px;
            border-radius: 4px;
            box-shadow: 0 2px 8px rgba(0, 0, 0, 0.1);
            z-index: 100;
            display: none;
            max-width: 300px;
            word-break: break-word;
        }

        .confidence {
            color: var(--primary-color);
            font-weight: bold;
        }
    </style>
</head>

<body>
    <div class="container">
        <h1>微信OCR文字识别工具</h1>

        <!-- 上传区域 -->
        <div class="upload-section">
            <div class="input-group">
                <input type="file" id="fileInput" accept="image/*">
                <p>或拖拽图片到此区域</p>
                <input type="text" id="urlInput" placeholder="输入图片URL地址">
            </div>
            <button onclick="processImage()">开始识别</button>
        </div>

        <!-- 图片预览 -->
        <div class="image-container" id="imageContainer">
            <img id="preview" class="preview-image">
            <!-- 文本框将在这里动态添加 -->
        </div>

        <!-- 加载状态 -->
        <div class="loading" id="loading">识别中,请稍候...</div>

        <!-- 错误提示 -->
        <div class="error" id="error"></div>

        <!-- 结果显示 -->
        <table class="result-table" id="resultTable">
            <thead>
                <tr>
                    <th>文本内容</th>
                    <th>置信度</th>
                    <th>位置信息 (左, 上, 右, 下)</th>
                </tr>
            </thead>
            <tbody id="resultBody"></tbody>
        </table>

        <!-- 使用说明 -->
        <h2>API接口说明</h2>
        <h3>请求方式</h3>
        <pre>POST /ocr</pre>

        <h3>请求示例</h3>
        <pre>
{
  "image": "BASE64_ENCODED_IMAGE_DATA"
}</pre>

        <h3>返回示例</h3>
        <pre id="responseSample"></pre>
    </div>

    <script>
        // 默认的API地址
        const API_ENDPOINT = window.location.origin + '/ocr';

        // 初始化拖放功能
        const uploadSection = document.querySelector('.upload-section');
        uploadSection.addEventListener('dragover', (e) => {
            e.preventDefault();
            uploadSection.style.backgroundColor = '#f0fff0';
        });

        uploadSection.addEventListener('drop', (e) => {
            e.preventDefault();
            uploadSection.style.backgroundColor = '';
            const file = e.dataTransfer.files[0];
            handleFile(file);
        });

        // 处理文件选择
        document.getElementById('fileInput').addEventListener('change', function (e) {
            handleFile(e.target.files[0]);
        });

        // 处理文件上传
        async function handleFile(file) {
            if (!file) return;
            if (!file.type.startsWith('image/')) {
                showError('请上传图片文件');
                return;
            }

            // 显示预览图片
            const reader = new FileReader();
            reader.onload = (e) => {
                document.getElementById('preview').src = e.target.result;
                document.getElementById('preview').style.display = 'block';

                // 清除之前的文本框
                const imageContainer = document.getElementById('imageContainer');
                const existingBoxes = imageContainer.querySelectorAll('.text-box, .text-tooltip');
                existingBoxes.forEach(box => box.remove());
            };
            reader.readAsDataURL(file);
        }

        // 开始处理图像
        async function processImage() {
            const file = document.getElementById('fileInput').files[0];
            const url = document.getElementById('urlInput').value;
            let base64Data = '';

            try {
                showLoading();
                clearError();

                if (file) {
                    base64Data = await fileToBase64(file);
                } else if (url) {
                    base64Data = await urlToBase64(url);
                } else {
                    showError('请选择图片或输入图片URL');
                    return;
                }

                // 发送请求
                const response = await fetch(API_ENDPOINT, {
                    method: 'POST',
                    headers: {
                        'Content-Type': 'application/json',
                    },
                    body: JSON.stringify({ image: base64Data })
                });

                const data = await response.json();
                handleResponse(data);
            } catch (error) {
                showError(`请求失败:${error.message}`);
            } finally {
                hideLoading();
            }
        }

        // 处理响应数据
        function handleResponse(data) {
            // 处理新的响应结构
            const resultData = data.result || data;

            if (resultData.errcode !== 0) {
                showError(`识别失败,错误码:${resultData.errcode}`);
                return;
            }

            // 显示结果表格
            const tbody = document.getElementById('resultBody');
            tbody.innerHTML = '';
            resultData.ocr_response.forEach(item => {
                const row = document.createElement('tr');
                row.innerHTML = `
                    <td>${item.text}</td>
                    <td>${(item.rate * 100).toFixed(2)}%</td>
                    <td>(${item.left.toFixed(1)}, ${item.top.toFixed(1)}, 
                        ${item.right.toFixed(1)}, ${item.bottom.toFixed(1)})</td>
                `;
                tbody.appendChild(row);
            });
            document.getElementById('resultTable').style.display = 'table';

            // 在图片上绘制识别区域
            drawTextBoxes(resultData.ocr_response, resultData.width, resultData.height);
        }

        // 在图片上绘制文本框
        function drawTextBoxes(ocrResults, originalWidth, originalHeight) {
            const imageContainer = document.getElementById('imageContainer');
            const preview = document.getElementById('preview');

            // 清除之前的文本框
            const existingBoxes = imageContainer.querySelectorAll('.text-box, .text-tooltip');
            existingBoxes.forEach(box => box.remove());

            // 获取图片的实际显示尺寸和位置
            const imgRect = preview.getBoundingClientRect();
            const containerRect = imageContainer.getBoundingClientRect();

            // 计算图片相对于容器的偏移
            const offsetX = imgRect.left - containerRect.left;
            const offsetY = imgRect.top - containerRect.top;

            // 计算缩放比例
            const scaleX = imgRect.width / originalWidth;
            const scaleY = imgRect.height / originalHeight;

            // 为每个识别结果创建文本框
            ocrResults.forEach((item, index) => {
                // 创建文本框
                const textBox = document.createElement('div');
                textBox.className = 'text-box';

                // 精确定位文本框,考虑图片在容器中的偏移
                const left = item.left * scaleX + offsetX;
                const top = item.top * scaleY + offsetY;
                const width = (item.right - item.left) * scaleX;
                const height = (item.bottom - item.top) * scaleY;

                // 设置文本框位置和大小
                textBox.style.left = `${left}px`;
                textBox.style.top = `${top}px`;
                textBox.style.width = `${width}px`;
                textBox.style.height = `${height}px`;
                textBox.dataset.index = index;

                // 创建提示框
                const tooltip = document.createElement('div');
                tooltip.className = 'text-tooltip';
                tooltip.innerHTML = `
                    <div>${item.text}</div>
                    <div class="confidence">置信度: ${(item.rate * 100).toFixed(2)}%</div>
                `;

                // 添加鼠标事件
                textBox.addEventListener('mouseenter', function (e) {
                    tooltip.style.left = `${e.pageX - imageContainer.offsetLeft + 10}px`;
                    tooltip.style.top = `${e.pageY - imageContainer.offsetTop + 10}px`;
                    tooltip.style.display = 'block';
                });

                textBox.addEventListener('mousemove', function (e) {
                    tooltip.style.left = `${e.pageX - imageContainer.offsetLeft + 10}px`;
                    tooltip.style.top = `${e.pageY - imageContainer.offsetTop + 10}px`;
                });

                textBox.addEventListener('mouseleave', function () {
                    tooltip.style.display = 'none';
                });

                imageContainer.appendChild(textBox);
                imageContainer.appendChild(tooltip);
            });
        }

        // 工具函数
        function fileToBase64(file) {
            return new Promise((resolve, reject) => {
                const reader = new FileReader();
                reader.onload = () => resolve(reader.result);
                reader.onerror = error => reject(error);
                reader.readAsDataURL(file);
            });
        }

        async function urlToBase64(url) {
            const response = await fetch(url);
            const blob = await response.blob();
            return fileToBase64(blob);
        }

        function showLoading() {
            document.getElementById('loading').style.display = 'block';
        }

        function hideLoading() {
            document.getElementById('loading').style.display = 'none';
        }

        function showError(message) {
            const errorDiv = document.getElementById('error');
            errorDiv.textContent = message;
            errorDiv.style.display = 'block';
        }

        function clearError() {
            document.getElementById('error').style.display = 'none';
        }

        // 初始化示例响应显示
        document.getElementById('responseSample').textContent = JSON.stringify({
            "result": {
                "errcode": 0,
                "height": 258,
                "imgpath": "temp/0cfbda36-a05d-4cba-9a72-cec6833d305d.png",
                "ocr_response": [
                    {
                        "bottom": 41.64999771118164,
                        "left": 33.6875,
                        "rate": 0.9951504468917847,
                        "right": 164.76248168945312,
                        "text": "API接口说明",
                        "top": 18.98750114440918
                    }
                ],
                "width": 392
            }
        }, null, 2);
    </script>
</body>

</html>

java中的抽象类

由于多态的存在,每个子类都可以覆写父类的方法,例如:

class Person {
    public void run() { … }
}

class Student extends Person {
    @Override
    public void run() { … }
}

class Teacher extends Person {
    @Override
    public void run() { … }
}

从Person类派生的Student和Teacher都可以覆写run()方法。

如果父类Person的run()方法没有实际意义,能否去掉方法的执行语句?

class Person {
    public void run(); // Compile Error!
}

答案是不行,会导致编译错误,因为定义方法的时候,必须实现方法的语句。

能不能去掉父类的run()方法?

答案还是不行,因为去掉父类的run()方法,就失去了多态的特性。例如,runTwice()就无法编译:

public void runTwice(Person p) {
    p.run(); // Person没有run()方法,会导致编译错误
    p.run();
}

如果父类的方法本身不需要实现任何功能,仅仅是为了定义方法签名,目的是让子类去覆写它,那么,可以把父类的方法声明为抽象方法:

class Person {
    public abstract void run();
}

把一个方法声明为abstract,表示它是一个抽象方法,本身没有实现任何方法语句。因为这个抽象方法本身是无法执行的,所以,Person类也无法被实例化。编译器会告诉我们,无法编译Person类,因为它包含抽象方法。

必须把Person类本身也声明为abstract,才能正确编译它:

abstract class Person {
    public abstract void run();
}

抽象类

如果一个class定义了方法,但没有具体执行代码,这个方法就是抽象方法,抽象方法用abstract修饰。

因为无法执行抽象方法,因此这个类也必须申明为抽象类(abstract class)。

使用abstract修饰的类就是抽象类。我们无法实例化一个抽象类:

Person p = new Person(); // 编译错误

无法实例化的抽象类有什么用?

因为抽象类本身被设计成只能用于被继承,因此,抽象类可以强迫子类实现其定义的抽象方法,否则编译会报错。因此,抽象方法实际上相当于定义了“规范”。

例如,Person类定义了抽象方法run(),那么,在实现子类Student的时候,就必须覆写run()方法:

// abstract class
public class Main {
    public static void main(String[] args) {
        Person p = new Student();
        p.run();
    }
}

abstract class Person {
    public abstract void run();
}

class Student extends Person {
    @Override
    public void run() {
        System.out.println("Student.run");
    }
}

面向抽象编程
当我们定义了抽象类Person,以及具体的Student、Teacher子类的时候,我们可以通过抽象类Person类型去引用具体的子类的实例:

Person s = new Student();
Person t = new Teacher();

这种引用抽象类的好处在于,我们对其进行方法调用,并不关心Person类型变量的具体子类型:

// 不关心Person变量的具体子类型:
s.run();
t.run();

同样的代码,如果引用的是一个新的子类,我们仍然不关心具体类型:

// 同样不关心新的子类是如何实现run()方法的:
Person e = new Employee();
e.run();

这种尽量引用高层类型,避免引用实际子类型的方式,称之为面向抽象编程。

面向抽象编程的本质就是:

  1. 上层代码只定义规范(例如:abstract class Person);
  2. 不需要子类就可以实现业务逻辑(正常编译);
  3. 具体的业务逻辑由不同的子类实现,调用者并不关心。
上层代码只定义规范(例如:abstract class Person)

在面向抽象编程中,上层代码的职责是定义规范或接口,而不是具体的实现。抽象类(abstract class)或者 接口(interface)用于定义规范,包含方法的声明,但不提供具体的实现。例如:

abstract class Person {
    public abstract void speak();
}

在这个例子中,Person 是一个抽象类,speak 是一个抽象方法。抽象类不能被直接实例化,它仅仅定义了子类必须实现的规范。

不需要子类就可以实现业务逻辑(正常编译)

这里的意思是,上层代码不需要依赖具体的子类来实现业务逻辑。上层代码只关心抽象类或接口所定义的规范,它并不关心具体的子类如何实现这些方法。上层代码通常只需要调用抽象方法,而不需要关注具体的子类实现,从而达到解耦。

例如,假设上层代码需要一个 Person 类型的对象,但是它并不关心这个 Person 是如何实现 speak() 方法的:

public class Main {
    public static void main(String[] args) {
        Person person = new Teacher();  // 可以直接用 Teacher 类来实现
        person.speak();  // 这行代码不关心 Teacher 类如何实现 speak 方法
    }
}

在上面的例子中,Main 类并不关心 Teacher 是如何实现 speak 方法的,它只关心 Person 类的定义和接口。Teacher 类提供了 speak 的具体实现,调用者可以使用 Teacher 类,而编译时代码依赖的是 Person 类的规范。

具体的业务逻辑由不同的子类实现,调用者并不关心

具体的业务逻辑实现由子类来完成,而上层代码并不关心业务逻辑的细节。不同的子类可以根据具体需求来实现不同的业务逻辑,而调用者则只需要依赖接口或抽象类的规范。

例如,Person 类有多个不同的子类,每个子类实现了自己的 speak 方法:

class Teacher extends Person {
    @Override
    public void speak() {
        System.out.println("I am a teacher, I teach.");
    }
}

class Student extends Person {
    @Override
    public void speak() {
        System.out.println("I am a student, I learn.");
    }
}

在上面的例子中,Teacher 和 Student 都是 Person 的子类,每个子类都实现了 speak 方法,但具体的实现内容不同。上层代码只需要关注 Person 类型的引用,而不需要关心具体是哪一个子类,哪个方法被调用,子类的实现细节对它来说是透明的。

public class Main {
    public static void main(String[] args) {
        Person teacher = new Teacher();
        Person student = new Student();
        teacher.speak();  // 输出 "I am a teacher, I teach."
        student.speak();  // 输出 "I am a student, I learn."
    }
}

java面向对象中的多态

在继承关系中,子类如果定义了一个与父类方法签名完全相同的方法,被称为覆写(Override)。
例如,在Person类中,我们定义了run()方法:

class Person {
    public void run() {
        System.out.println("Person.run");
    }
}

在子类Student中,覆写这个run()方法:

class Student extends Person {
    @Override
    public void run() {
        System.out.println("Student.run");
    }
}

Override和Overload不同的是,如果方法签名不同,就是Overload(重载),Overload方法是一个新方法;如果方法签名相同,并且返回值也相同,就是Override(覆写)。
方法名相同,方法参数相同,但方法返回值不同,也是不同的方法。在Java程序中,出现这种情况,编译器会报错。

class Person {
    public void run() { … }
}

class Student extends Person {
    // 不是Override,因为参数不同:
    public void run(String s) { … }
    // 不是Override,因为返回值不同:
    public int run() { … }
}

加上@Override可以让编译器帮助检查是否进行了正确的覆写。希望进行覆写,但是不小心写错了方法签名,编译器会报错。

// override
public class Main {
    public static void main(String[] args) {
    }
}

class Person {
    public void run() {}
}

public class Student extends Person {
    @Override // Compile error!
    public void run(String s) {}
}

但是@Override不是必需的。

引用变量的声明类型可能与其实际类型不符,例如:

Person p = new Student();

现在,我们考虑一种情况,如果子类覆写了父类的方法:

// override
public class Main {
    public static void main(String[] args) {
        Person p = new Student();
        p.run(); // 应该打印Person.run还是Student.run?
    }
}

class Person {
    public void run() {
        System.out.println("Person.run");
    }
}

class Student extends Person {
    @Override
    public void run() {
        System.out.println("Student.run");
    }
}

那么,一个实际类型为Student,引用类型为Person的变量,调用其run()方法,调用的是Person还是Student的run()方法?
运行一下上面的代码就可以知道,实际上调用的方法是Student的run()方法。因此可得出结论:
Java的实例方法调用是基于运行时的实际类型的动态调用,而非变量的声明类型。
这个非常重要的特性在面向对象编程中称之为多态。它的英文拼写非常复杂:Polymorphic。

多态

多态是指,针对某个类型的方法调用,其真正执行的方法取决于运行时期实际类型的方法。例如:

Person p = new Student();
p.run(); // 无法确定运行时究竟调用哪个run()方法

有同学会说,从上面的代码一看就明白,肯定调用的是Student的run()方法啊。
但是,假设我们编写这样一个方法:

public void runTwice(Person p) {
    p.run();
    p.run();
}

它传入的参数类型是Person,我们是无法知道传入的参数实际类型究竟是Person,还是Student,还是Person的其他子类例如Teacher,因此,也无法确定调用的是不是Person类定义的run()方法。
所以,多态的特性就是,运行期才能动态决定调用的子类方法。对某个类型调用某个方法,执行的实际方法可能是某个子类的覆写方法。这种不确定性的方法调用,究竟有什么作用?
我们还是来举例子。
假设我们定义一种收入,需要给它报税,那么先定义一个Income类:

class Income {
    protected double income;
    public double getTax() {
        return income * 0.1; // 税率10%
    }
}

对于工资收入,可以减去一个基数,那么我们可以从Income派生出SalaryIncome,并覆写getTax():

class Salary extends Income {
    @Override
    public double getTax() {
        if (income <= 5000) {
            return 0;
        }
        return (income - 5000) * 0.2;
    }
}

如果你享受国务院特殊津贴,那么按照规定,可以全部免税:

class StateCouncilSpecialAllowance extends Income {
    @Override
    public double getTax() {
        return 0;
    }
}

现在,我们要编写一个报税的财务软件,对于一个人的所有收入进行报税,可以这么写:

public double totalTax(Income... incomes) {
    double total = 0;
    for (Income income: incomes) {
        total = total + income.getTax();
    }
    return total;
}

来试一下:

// Polymorphic
public class Main {
    public static void main(String[] args) {
        // 给一个有普通收入、工资收入和享受国务院特殊津贴的小伙伴算税:
        Income[] incomes = new Income[] {
            new Income(3000),
            new Salary(7500),
            new StateCouncilSpecialAllowance(15000)
        };
        System.out.println(totalTax(incomes));
    }

    public static double totalTax(Income... incomes) {
        double total = 0;
        for (Income income: incomes) {
            total = total + income.getTax();
        }
        return total;
    }
}

class Income {
    protected double income;

    public Income(double income) {
        this.income = income;
    }

    public double getTax() {
        return income * 0.1; // 税率10%
    }
}

class Salary extends Income {
    public Salary(double income) {
        super(income);
    }

    @Override
    public double getTax() {
        if (income <= 5000) {
            return 0;
        }
        return (income - 5000) * 0.2;
    }
}

class StateCouncilSpecialAllowance extends Income {
    public StateCouncilSpecialAllowance(double income) {
        super(income);
    }

    @Override
    public double getTax() {
        return 0;
    }
}

观察totalTax()方法:利用多态,totalTax()方法只需要和Income打交道,它完全不需要知道Salary和StateCouncilSpecialAllowance的存在,就可以正确计算出总的税。如果我们要新增一种稿费收入,只需要从Income派生,然后正确覆写getTax()方法就可以。把新的类型传入totalTax(),不需要修改任何代码。

可见,多态具有一个非常强大的功能,就是允许添加更多类型的子类实现功能扩展,却不需要修改基于父类的代码。

覆写Object方法
因为所有的class最终都继承自Object,而Object定义了几个重要的方法:

toString():把instance输出为String;
equals():判断两个instance是否逻辑相等;
hashCode():计算一个instance的哈希值。
在必要的情况下,我们可以覆写Object的这几个方法。例如:

class Person {
    ...
    // 显示更有意义的字符串:
    @Override
    public String toString() {
        return "Person:name=" + name;
    }

    // 比较是否相等:
    @Override
    public boolean equals(Object o) {
        // 当且仅当o为Person类型:
        if (o instanceof Person) {
            Person p = (Person) o;
            // 并且name字段相同时,返回true:
            return this.name.equals(p.name);
        }
        return false;
    }

    // 计算hash:
    @Override
    public int hashCode() {
        return this.name.hashCode();
    }
}

调用super

在子类的覆写方法中,如果要调用父类的被覆写的方法,可以通过super来调用。例如:

class Person {
    protected String name;
    public String hello() {
        return "Hello, " + name;
    }
}

class Student extends Person {
    @Override
    public String hello() {
        // 调用父类的hello()方法:
        return super.hello() + "!";
    }
}

final

继承可以允许子类覆写父类的方法。如果一个父类不允许子类对它的某个方法进行覆写,可以把该方法标记为final。用final修饰的方法不能被Override:

class Person {
    protected String name;
    public final String hello() {
        return "Hello, " + name;
    }
}

class Student extends Person {
    // compile error: 不允许覆写
    @Override
    public String hello() {
    }
}

如果一个类不希望任何其他类继承自它,那么可以把这个类本身标记为final。用final修饰的类不能被继承:

final class Person {
    protected String name;
}

// compile error: 不允许继承自Person
class Student extends Person {
}

对于一个类的实例字段,同样可以用final修饰。用final修饰的字段在初始化后不能被修改。例如:

class Person {
    public final String name = "Unamed";
}

对final字段重新赋值会报错:

Person p = new Person();
p.name = "New Name"; // compile error!

可以在构造方法中初始化final字段:

class Person {
    public final String name;
    public Person(String name) {
        this.name = name;
    }
}

这种方法更为常用,因为可以保证实例一旦创建,其final字段就不可修改。

Agent、RAG、Function Call与MCP

Agent(智能体)
RAG(检索增强生成)
Function Call(函数调用)
MCP(模型上下文协议)

特性 MCP (模型上下文协议) RAG (检索增强生成) Agent (智能体) Function Call (函数调用)
核心思想 标准化 AI 与外部数据/工具的通信协议 检索外部知识 + 增强提示 + 生成回答 LLM驱动的自主决策与任务执行系统 LLM请求执行外部预定义函数/工具的能力
本质 协议/规范 技术框架/方法 系统/应用范式 模型能力/特性
通俗比喻 标准化的 USB 接口 写论文前先查资料 能干的私人助理 助理按指令使用 App
关系链 可作为 Agent 调用工具的底层标准 常被 Agent 用作获取知识的手段 核心指挥官,使用 RAG/Function Call 等工具 Agent 执行具体动作的基本手段

简单来说,它们的关系就像:

• Agent (智能体) 是那个目标导向的项目经理/大脑。
• RAG 和 Function Call 是它工具箱里的得力工具:RAG 负责查资料、找依据;Function Call 负责执行具体操作、调用外部 API。
• MCP 则致力于提供一个标准化的接口规范,让 Agent 能更方便、更统一地接入和使用各种工具(无论是 RAG 功能还是其他 Function Call 实现的工具)。

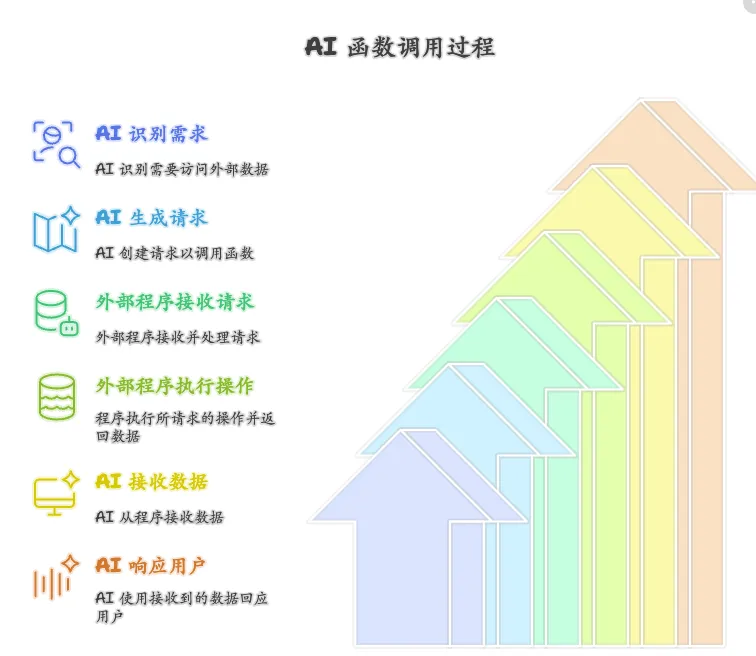
• 这是啥? Function Call 是 LLM 的一项内置“特异功能”。它允许 LLM 在需要的时候,请求外部程序帮它做点事。注意,是“请求”,不是“亲自做”。
• 为啥要它? 因为 LLM 自己查不了实时股价、订不了机票、发不了邮件。有了 Function Call,LLM 就能“指挥”其他工具来完成这些操作。
• 通俗比喻: 就像你让智能音箱帮你“查下今天北京天气”。音箱(LLM)自己感知不到天气,但它知道要去调用“天气查询”这个App(预定义的函数/工具)。它生成指令(“查北京天气”),App 执行后把结果(“晴,25度”)告诉音箱,音箱再用自然语言告诉你。
• 简单例子: 你问 AI:“AAPL 股价多少?” AI 判断需要查实时数据,于是生成一个“请求”:{调用函数: "查股价", 参数: {"股票代码": "AAPL"}}。外部程序收到请求,查询API,返回结果 {"价格": 180.50}。AI 再根据这个结果回答你:“苹果当前股价是 180.50 美元。”

• 这是啥? RAG (Retrieval-Augmented Generation) 是一种让 AI 回答更靠谱的技术框架。简单说,就是在 AI 回答问题 之前,先让它去指定的资料库(比如公司内部文档、最新的行业报告)里查找 (Retrieval) 相关信息。
• 为啥要它? 防止 AI一本正经地“胡说八道”(专业术语叫“幻觉”),让它的回答基于最新的、准确的、特定的事实依据。
• 通俗比喻: 好比你写论文要引用最新数据。你不会光凭记忆(LLM 的内部知识)瞎写,而是会先去图书馆或数据库查资料 (检索),把找到的关键信息整合 (增强)进你的论据里,最后才下笔写作 (生成)。RAG 就是让 AI 也学会这种“先查再答”的好习惯。
• 简单例子: 你问 AI:“我们公司最新的报销政策是啥?” RAG 系统先去公司内部知识库检索“报销政策”文档,找到相关段落。然后把这些段落和你的问题一起“喂”给 AI,AI 参考着这些最新政策,给你一个准确的回答。

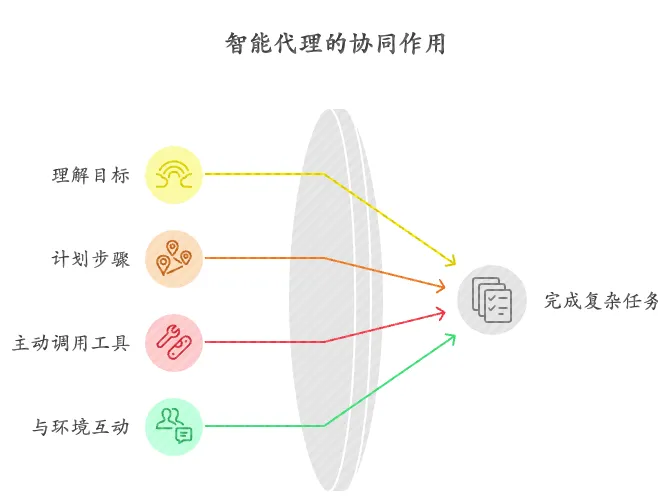
• 这是啥? Agent(智能体)是一个更高级、更自主的 AI 系统。它以 LLM 作为核心“大脑”,不仅能理解你的目标,还能自己思考、规划步骤,并主动调用工具(比如上面说的 RAG 和 Function Call)来执行任务,与外部环境互动。
• 为啥要它? 为了完成那些光靠聊天解决不了的复杂任务,比如“帮我规划下周去上海的出差行程,包括订机票酒店,并把日程发给我”。
• 通俗比喻: Agent 就像一个超级能干的私人助理。你给个目标,它自己就能拆解任务、查信息(可能用 RAG 查公司差旅标准,用 Function Call 查航班酒店)、做决策、执行操作(用 Function Call 调用预订 API),最后给你结果。它是有自主“行动力”的。
• 简单例子: 你让 Agent:“分析一下竞品 X 的最新动态,写个简报。” Agent 会自己规划:① 搜索最新新闻(调用 Function Call);② 查内部研究报告(调用 RAG);③ 分析总结信息(LLM 大脑);④ 生成简报(调用 Function Call)。

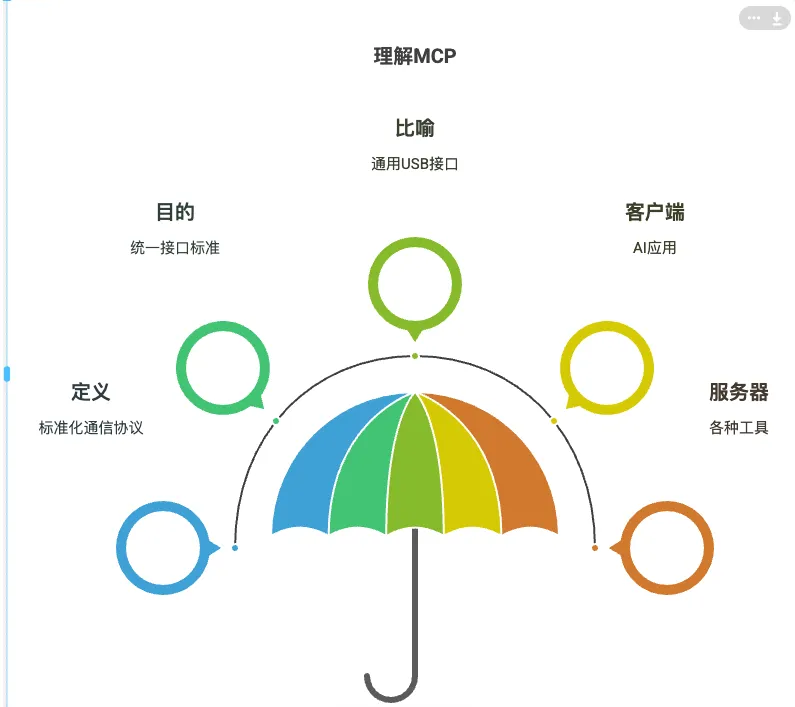
• 这是啥? MCP (Model Context Protocol) 是 Anthropic 公司(就是搞出 Claude 那个)在 2024 年底提出并开源的一种标准化通信协议。它定义了一套规则,让 AI 应用(客户端)能以统一的方式,与各种外部数据源或工具(服务器)进行交互。
• 为啥要它? 想象一下,如果每个工具都有自己独特的接口,那 Agent 想用多个工具时,岂不是要学 N 种“方言”?MCP 就是想统一这个接口标准,让工具“即插即用”。
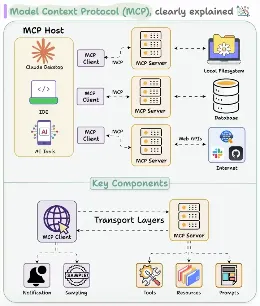
• 通俗比喻: MCP 就像是给 AI 大脑和外部工具之间制定了一个通用的 USB 接口标准。无论是本地文件系统、数据库,还是 Slack、GitHub 这些应用,只要它们提供符合 MCP 标准的“服务器”,AI 应用(客户端)就能轻松连接并使用它们的功能,无需为每个工具单独适配。
• 简单例子: 在支持 MCP 的编辑器里,你可以让 AI“把我 /docs 目录最新的 Markdown 文件总结一下,发到 Slack 的 #general 频道”。编辑器(MCP 客户端)通过 MCP 协议,与本地的“文件系统 MCP 服务器”和“Slack MCP 服务器”沟通,协调完成整个任务。

支持 MCP 的客户端/服务器:

• 客户端: Claude Desktop App, Cursor, Windsurf, Cherry Studio 等 AI 编辑器或应用。
• 服务器: Anthropic 官方和社区提供了针对 Google Drive, Slack, GitHub, Git, Postgres, Puppeteer, Milvus (向量数据库), Firecrawl (网页抓取) 等的开源 MCP 服务器实现。开发者也可以根据 MCP 规范自定义服务器。目前,为安全起见,MCP 服务器通常在本地运行。

1 2 3 4 12